Showing posts with label classroom photos. Show all posts

Thursday, August 8, 2013

How to Make Your Very Own Mr. Sun from Eric Carle

Look who will be visiting my room every day this year! Yep that is Mr. Sun and isn't he fabulous. Now I'm not really sure what his real name is but that is what I'm going to call him. I might even have to bust into that Raffi song, Mr. Sun, every once in a while.
I can't help but smile when I see him. Now for those of you who might not know who Mr. Sun is, he is a character that pops up in a lot of Eric Carle's children's books. I used this picture from The Very Hungry Caterpillar to be my guide. I was pretty darn close if you ask me!
Here's another view with more of my classroom. I love that he is right between those big windows. I'll never complain about sunshine in a classroom.

To make him, I used a book as a reference, foam brushes, cups for the paint, a large piece of white butcher paper, a yardstick, and tempera paint in yellow, red, and orange.

I started by painting with yellow in different directions and then repeated with orange. I switched back and forth between the two colors a lot. I made the shape much bigger than I needed because I needed to have extra paint pieces for his sun rays. Don't think too much about this. Have fun with it. Eric Carle calls this making "Pretty Paper" and if you haven't seen the video of him making his art, I highly recommend it.

After I got his body nice and radiant, I used a yardstick to make a straight line across the bottom and then measured out my arch. My sun is just about 35 inches across and the arch is 18 inches from the center. I know he doesn't look that big.
 
After I cut him out, I used a pencil to draw the face and then covered it with red paint mixed with yellow to make a darker orange.  I cut the extra left over painted pieces into 1 inches strips of varying lengths for his rays. I did mine in a short, long pattern. Eric Carle's version is much more random. Make it fit you.
 
To hang it up, I just rolled blue painter's tape on the back of him. The blue painter's tape is great for preventing wall damage. It is also easy to peel off and restick if you don't like how you hung something. 
 
 I'm now even more excited to get started on the other characters. I'll keep posting more pics as I get more of my room done.

Wednesday, August 7, 2013

Scrunchy Borders!

I just started going into my classroom this week. I've officially gotten the room rearranged and I am starting to work on my walls. I felt a little stuck on my bulletin boards this year but after looking at Jennifer's blue border over at First Grade Blue Skies, I was inspired to make my own scrunched border. I wanted to make it fun and colorful so I went all out with rainbow. ROYGBIV anyone?! I decided to leave the cork because I didn't want to add a color and make the look overwhelming. I really love the way it turned out.
 
This will be my future reading table/desk. One board will be our group names, reading strategies, and goals. The other will be a phonics reference chart and pocket chart for skill building.
 
I also have another large board that I am going to use as my word wall for this year. I have a little table that I am going to put in front of it so kiddos can work there during Work on Writing.

Here are the supplies that you need to make your own. I tore off large pieces of butcher paper and then cut them into strips using a paper cutter. Also be sure to use a good stapler that will open up all the way. Mine was a little fussy and kept jamming. It almost ended up getting to know the trash can better. :)

I had the pieces folded in half for cutting so this red piece gives you a better look at what the length is. It's about 2 feet long and maybe 4 or 5 wide. I know it seem big but remember that you are scrunching it.
 
I would not use regular paper for this. The butcher paper works well because it is thin and easy to manipulate. I think newspaper, thin scrapbook paper, and tissue paper would work just as well.


I liked starting in the top right hand corner and then working down and around. This helped me keep my pattern of ROYGBIV; however, if you are using one color or like to be spontaneous, start wherever. To start at the corner, all I did was pinch and wrinkle the paper. When I thought it looked good, I added a staple and moved down. It's a little awkward at first but then you get a groove going.

 I found that if I looped both of my fingers under the paper and pulled it forward and then wrinkled the bottom, it looked a little nicer. The beauty of making this border is if you don't like something pull it off and restaple it. I did it several times on my word wall board and you can't tell at all. I also tried wadding the paper in a ball first before stapling it but I didn't like it as much.

 Here's a view of all of the boards together. I'm so excited about these! Now I just need to get to work on the rest of the room!

Saturday, August 6, 2011

Slow and Steady Wins the Race

I have adopted the Tortoise's motto of "Slow and steady wins the race" for setting up my classroom this year. A little work (okay....a lot of work) here and there and I should be already for my first grade kiddos on Back to School Night August 25th. Here are my before pictures and with a little elbow grease, I hope to have an Underwater Oasis ready in a couple of weeks. I'll keep you posted on my progress. Cross your fingers for me.
Here is the view from my front door. I am battling how to set up my desks this year but I am thinking of doing two horseshoe shapes so that my projector will still have room in the middle of the room. The two blue boards are my word wall and the yellow board is for student work. I am thinking "Chicka, Chicka, Boom Boom. Look at the good work in our room. "


Here are my front boards. I set up my calendar on the left, schedule in the middle, and the white board on the right holds our Morning Message and any work we do during the day.


Believe it or not, this kidney table is my desk. I decided last year that I no longer needed a desk since it only became a place for additional storage and took away from kid space. With that said, I got rid of it and never looked back. I use the white plastic drawer set for all of my supplies that once upon a time were in my desk. I love using this space for reading groups, math groups, and one-on-ones. This allows for my second kidney table to be used by an aide, a parent, or additional space for projects.


This is my closet, reading focus wall, and bathroom. The second kidney table is usually along the wall and the space in front of the board is my carpet area.


This is the side of the room by the door. So scary! My computers will reside here along with the second kidney table and if I am lucky a math nook. Thanks for viewing my classroom and I hope you enjoy the changes I am working on for my little home away from home.


cartoon graphicsPriscilla

Friday, August 5, 2011

The before...if only it wasn't so hard to get to the after!

Happy Friday! I would normally be very excited to say that, but with summer vacation dwindling too quickly it kind of makes me sad! Since we are new to blogging and love spending time blog stalking all of those a-maz-ing first grade blogs out there, we wanted to begin with some pictures of our classrooms since that is one of our favorite things to stalk. Don't you just love looking into other teachers' rooms...be honest you know you peek in the window walking down the hallway !

Here are a couple pictures of my new first grade classroom...I recently transferred schools and thus moved into a new school and a new room. Here is a picture from the door. Here is another showing the two large bulletin boards which are to the left of the door. I am hoping to have my Popcorn Words (word wall) on the yellow board and my CAFE and Scott Foresman Reading Street Focus Board on the blue one. Yuck, the cubbies are in pretty bad shape, I am going to spruce them up with some cute lime green contact paper.
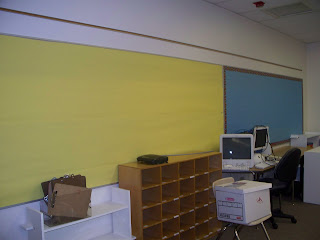
This is a picture of of the library...yikes! Lots of work left to do here sorting, labeling and cozying up this space. Nobody would want to read here as it is now! Here is a view of the back corner. I am going to hang a close line and cute-ify the large board you can see to display student work. I do love the cupboards and drawers, you can never get enough storage!
It's too daunting to actually write out everything on my to do list, but I have 17 days left to prep before the meetings and craziness begins. Be sure to check out my next post...more on my OWL theme!

cartoon graphicsJennifer